Clojurescript and Closure UI Tutorial
I am researching the available Clojure options for web and front end development at the moment and plan to create a series of posts that document what I learn as I go. This post will be an introduction to using the Google Closure libraries with Clojurescript. It assumes some basic familiarity with Clojurescript.
The Google Closure library and tools are interesting pieces of engineering in their own right, and well worth further investigation. Also, the fact Clojurescript is built on top of Closure does have implications for Clojurescript programmers. I may cover some of these implications in future tutorials, but first lets just create our first working Clojurescript application.
Getting started
First we will start off with a boring hello world example, then we will port the Google notepad example to Clojurescript. Our first pass will use the standard Google Closure API. We will then add the Dommy library from Prismatic to make our code more idiomatic. Lets start off by creating a new project using the mies leiningen template
$ lein new mies notepad
This generates a folder and files similar to a standard Clojure project, but this time our project is set up for Clojurescript development. Open a terminal in the project directory and run
$ lein cljsbuild auto
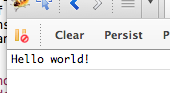
This will take some time to finish the first time it is run (approx. 20 seconds on my 2011 Macbook Air) but it runs almost instantaneously after that. If you now open index.html in a browser and check the JavaScript console you should see “Hello world!” printed there.
First pass at Notepad example
Next, lets start translating the Notepad JavaScript example to Clojurescript. Its a visually fairly unimpressive example but it does cover the basics and we can build on it in future if required.
First, lets add the HTML we need to index.html. We need to add a div with and id of notes and we are also going to use the same main function written in JavaScript that the Closure tutorial uses. We could rewrite this in Clojurescript but I think it is interesting to see how to call Clojurescript code from JavaScript. Clojurescripts great interoperability allows you to introduce Clojurescript code to an existing JavaScript code base gradually. Our index.html page should now contain
<html>
<body>
<div id="notes"></div>
<script src="out/goog/base.js" type="text/javascript"></script>
<script src="notepad.js" type="text/javascript"></script>
<script type="text/javascript">goog.require("notepad.core");</script>
<script>
function main() {
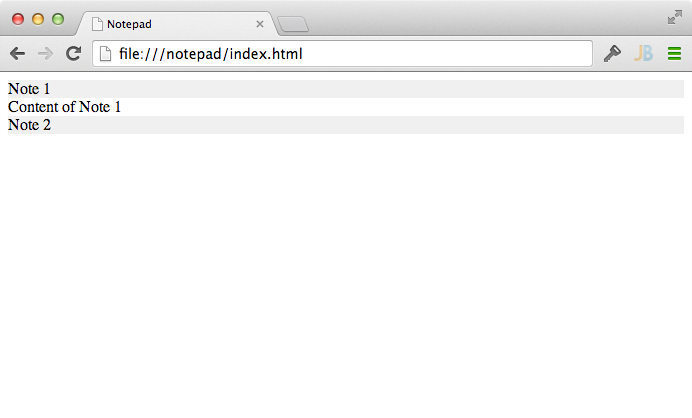
var noteData = [
{''title'': ''Note 1'', ''content'': ''Content of Note 1''},
{''title'': ''Note 2'', ''content'': ''Content of Note 2''}];
var noteListElement = document.getElementById(''notes'');
var notes = notepad.core.makeNotes(noteData, noteListElement);
}
main();
</script>
</body>
</html>
OK, now lets get to work on the Clojurescript code. Open core.cljs and modify the namespace declaration to include goog.dom and goog.ui as follows:
(ns notepad.core
    (:require [goog.dom :as dom])
    (:import [goog.ui Zippy]))
Next we will create the makeNotes function the JavaScript code expects. We nee to add the export metadata tag to this function to make it callable from JavaScript (this is due to the Closure compiler).
(defn ^:export makeNotes [notes]
    (.log js/console notes))
When we refresh index.html we should now see the JavaScript object containing our notes printed to the console.

Great, everything is wired up correctly. The Closure tutorial creates a Note function that converts an item in the notes dictionary into a notes object, lets do something similar in Clojurescript. First we will convert the JavaScript note object into a Clojurescript map using the js->clj function form clojure.core, then we will change it to use keywords and finally add the parent element to it.
(defn create-note [item el]
    (let [data (js->clj item)]
        {:title (data "title") :content (data "content") :parent el}))
Converting the map to use keywords is necessary, but it allows us to create more idiomatic code. Next we translate the Closure makeNoteDom to Clojurescript
(defn make-note-dom [note]
    (let [header-el (dom/createDom "div"
                                   (clj->js {"style" "background-color:#EEE"})
                                   (:title note))
          content-el (dom/createDom "div" nil (:content note))
          new-note (dom/createDom "div" nil header-el content-el)]
      (dom/append (:parent note) new-note)
      (Zippy. header-el content-el)))
And finally, we need to tie it all together. Modify makeNotes so it looks like the following.
(defn ^:export makeNotes [notes container]
    (doseq [note notes]
        (make-note-dom (create-note note container))))
Now, when you refresh index.html you should see two zippies and clicking on the titles should show and hide the contents of the notes.
The full core.cljs file:
Using Dommy
Dommy is a library created by Prismatic that lets us perform more idiomatic templating and dom manipulation using Clojurescript. Add
[prismatic/dommy "0.1.1"]
to our projects dependencies and run
$ lein deps
To download it. Then restart the lein cljsbuild plugin to pick it up
$ lein cljsbuild auto
Next, we can remove goog.dom and add some dommy imports to our namespace declaration
(ns notepad.core
    (:require [dommy.utils :as utils]
              [dommy.core :as dommy])
    (:use-macros [dommy.macros :only [node deftemplate]])
    (:import [goog.ui Zippy]))
Now we will modify our existing code to use dommy. create-note and makeNotes don’‘t do any dom manipulation, so they remain unchanged. First, lets create two templates for our note header and note content elements and a function to tie them together:
(deftemplate note-header [title]
    [:div {:style {:background-color "#EEE"}} title])

(deftemplate note-content [content]
    [:div content])

(defn note-element [header content]
    (node [:div header content]))
Here we can see one of Clojurescripts strengths come into play, data. In our previous version we were passing strings into functions to generate templates, now we can pass in data structures and let dommy convert them to html nodes for use. Another advantage is that deftemplate and node are macros, not functions, this means the conversion can be carried out at compile time rather than runtime, giving us better performance as well as cleaner code. The Prismatic team have created a blog post about this. Now, we can update make-note-dom to use our new templates.
(defn make-note-dom [note]
    (let [header-el (note-header (:title note))
          content-el (note-content (:content note))]
      (dommy/append! (:parent note) (note-element header-el content-el))
      (Zippy. header-el content-el)))
The full core.cljs file:
Conclusion
Hopefully by now you have seen it is fairly easy to get started creating Clojurescript applications using the Closure and third party libraries. I hope I have also shown some of the advantages of using Clojurescript: more declarative code and potential performance improvements.