Displaying MQTT messages in a browser in real time
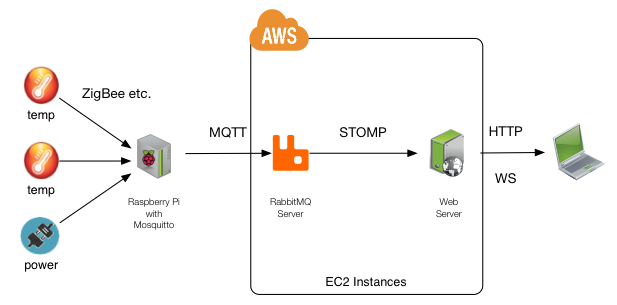
I have recently been investigating how to display MQTT messages in a web browser in real time. The MQTT server I use is Mosquitto as it is light weight and can be run on low power (ARM) devices, ideal if you want to use a Raspberry Pi as a gateway for sensors around your house.
The first and most obvious way to do this is to put a websockets proxy in front of your MQTT broker and use the Eclipse Paho MQTT Javascript client to communicate with the broker. HiveMQ, a commercial product offers this feature out of the box. Mosquitto does not however, but its creator Roger Light has created a patched version of lighttpd that can act as such a proxy (This is what http://test.mosquitto.org uses). This is probably the route you want to take for an experimental installation, however I wanted something a bit more robust.
Enter RabbitMQ, a popular and widely deployed AMQP broker which has a MQTT plugin and a Web Stomp plugin that allows a web browser to subscribe to messages using the Stomp protocol over a websocket.
MQTT brokers have a neat feature called bridging which allows one broker to publish and receive messages from another broker without you having to write any code.
So, its time to put all this together. As I mentioned, Mosquitto is ideal for running on low power devices and RabbitMQ is commercially supported and can be scaled to deal with millions of messages a second. After installing Mosquitto on my ARM device, I installed RabbitMQ on an EC2 instance, I then set up a bridge between the two, with Mosquitto sending every message it receives to RabbitMQ. Finally I created a web page that is able to display these messages to a user in real time.
Setting up RabbitMQ
See http://www.rabbitmq.com/download.html for instructions on how to install RabbitMQ. If you are deploying on EC2 or similar you will need to make sure the following ports are open:
| Port | Reason |
|---|---|
| 22 | SSH access |
| 5672 | Used to send/receive AMQP messages |
| 1883 | Used to send/receive MQTT messages |
| 15674 | Used to send/receive STOMP messages |
| 15672 | Optional Used by the web management plug-in |
Once installed we need to enable the MQTT and Web Stomp plugins. We do this by running
$ rabbitmq-plugins enable rabbitmq_mqtt
$ rabbitmq-plugins enable rabbitmq_web_stomp
$ rabbitmq-plugins enable rabbitmq_management # optional
Once you restart RabbitMQ server the plugins will be enabled.
Setting up Mosquitto
Next we need to install Mosquitto on our Raspberry Pi. Make sure you get the latest version of Mosquitto, for instructions on how to get the latest release for your OS/Architecture see http://mosquitto.org/download/. The Debian repository contains ARM versions that will work with the Raspberry PI. You may have to add the package version to the usual apt-get command to install the latest release, apt-cache show mosquitto will list all the versions available to you.
$ apt-get install mosquitto=1.2.2-0mosquitto1
We then need to add the bridge to our config file. You can read the full details of how to create bridges in the Mosquitto.conf man page but for now I will just describe what we need for our setup. Edit /etc/mosquitto/mosquitto.conf adding the following to the Bridges section:
    connection main
    address <rabbitmq-broker-url>
    topic # both 0 sensor/ sensor/jons-house/
So, firstly we give our connection a name (every connection in a config file must have a unique name). Secondly, we tell Mosquitto the address of the broker we want it to bridge with. Thirdly, we describe how we want topics to be shared among the two brokers. The topic keyword is described as:
topic pattern [[[ out | in | both ] qos-level] local-prefix remote-prefix]
So we have set our pattern to ‘’#’’ which in MQTT means everything (think posix ‘’*’’), we have specified we want communication to be two way, ‘‘both’’, our QOS level is set to 0, and we are mapping everything sent to the local ‘‘sensor/’’ topic, to the remote ‘‘sensor/jons-house’’ topic.
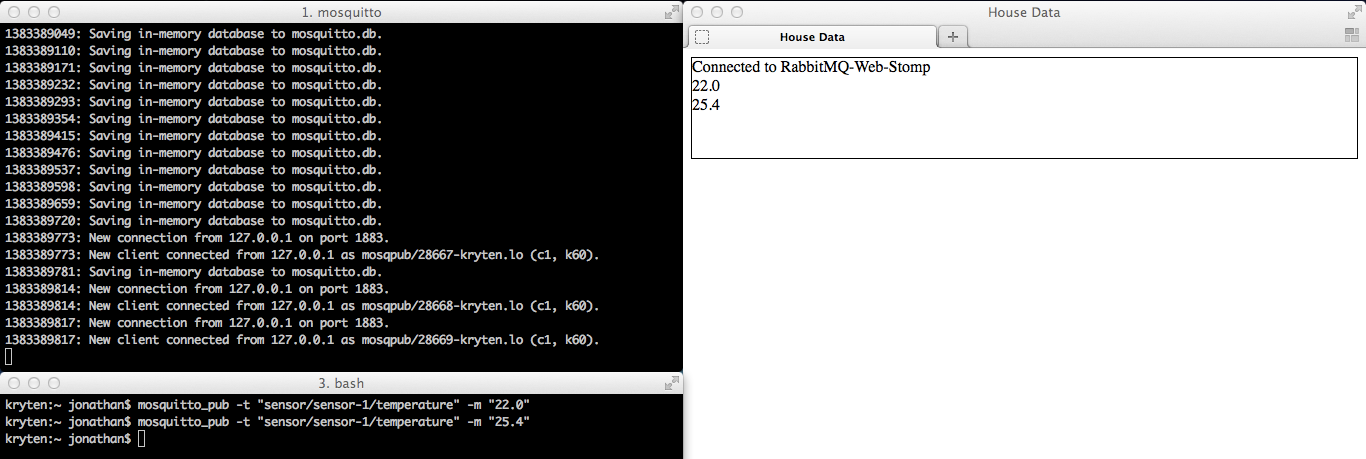
Now, lets test our set up so far using the Mosquitto command line tools. In one terminal window on the Raspberry Pi we will subscribe to the topic on the RabbitMQ host (you can do this from any machine and you should see the same result):
$ mosquitto_sub -h <rabbitmq-url> -t topic/sensor/jons-house/#
'’topic’’ is the name of the exchange used by default on RabbitMQ.
And in a second window we will publish messages to the local Mosquitto broker (this needs to be run on the Pi):
$ mosquitto_pub -h sensor/kitchen/temperature -m “22.3C”
If everything worked correctly you should see “22.3C” printed in the subscriber terminal window. The only problem is that the ‘‘kitchen/temperature’’ part of the topic is lost due to our bridge, if this is important to you, change the topic line to something like:
topic kitchen/temperature/ both 0 sensor/ sensor/jons-house/
Now everything sent to the local ‘‘topic/kitchen/temperature’’ topic will appear on RabbitMQ as ‘‘sensor/jons-house/kitchen/temperature’’. This allows more information to be passed on, but also means you need to explicitly create a topic line for every topic you wish to bridge. A middle ground may be to publish json messages rather than just the temperature to the ‘‘sensor’’ topic but that too has pros and cons. It is up to you to decide what works best for your installation.
Creating our web application
Finally we need to create a simple web application to start displaying the readings in real time. First, we need to create a simple HTML page:
    <html>
    <head>
      <title>House Data</title>
      <script src="http://cdn.sockjs.org/sockjs-0.3.js"></script>
      <script src="stomp.js"></script>
      <script src="app.js"></script>

      <style>
        #console {
          border: 1px solid black;
          min-height: 100px;
        }
      </style>
    </head>
      <body>
        <div id="console"></div>
      </body>
    </html>
And the Javascript used to communicate with RabbitMQ, app.js:
    // Use SockJS
    Stomp.WebSocketClass = SockJS;

    var username = "guest",
        password = "guest",
        vhost    = "/",
        url      = ''http://'' + ''<rabbitmq-url>'' + '':15674/stomp'',
        queue    = "/topic/sensor.jons-house.#"; // To translate mqtt topics to
        					     // stomp we change slashes
        					     // to dots
    var console;

    function on_connect() {
      console += ''Connected to RabbitMQ-Web-Stomp<br />'';
      console.log(client);
      client.subscribe(queue, on_message);
    }

    function on_connection_error() {
      console.innerHTML += ''Connection failed!<br />'';
    }

    function on_message(m) {
      console.log(''Received:'' + m);
      output.innerHTML += m.body + ''<br />'';
    }

    var ws = new SockJS(url);
    var client = Stomp.over(ws);
    client.heartbeat.outgoing = 0;
    client.heartbeat.incoming = 0;

    window.onload = function () {
      console = document.getElementById("console");
      // Connect
      client.connect(
        username,
        password,
        on_connect,
        on_connection_error,
        vhost
      );
    }
You can download stomp.js from the Stomp Websocket github page.
You can then serve up the page using a web server or if you don’‘t have one installed you can use python’’s inbuilt server for testing. cd to the directory containing your HTML and Javascript files and run:
python -m SimpleHTTPServer
If you now open http://localhost:8000 in your browser you should be able to see any message you send using the mosquitto_pub tool.